My Dissertation - Week 8

Sorry for the week break, I was away for 5 days and then spent a day driving around the UK so I've basically skipped a week of work. Technically this is week 9 of work, but it's the 8th iteration of work for my project.
This iterations tasks consisted of creating the actual pages from their corresponding wireframes (created in the previous iteration). I also had to link each page to the other in some way, to create a coherent front-end.
Landing page
The landing page was by far the easiest and that's because it didn't have any dynamic content, it's just a standard HTML page. The only work I had to do for this was thinking of how I could pass the information from the landing page's AJAX request into the next page, or if I even needed a new page for it.
After considering the options, I decided that a separate page was needed for the itinerary because of the sheer volume of information it would hold, the fact that this page is essentially the core of the application and it would be easier to at some point in the future, make shareable itinerary links.
Here is the function I use to submit my location and process the response from my server:
function send_location(location) {
  let my_url = 'http://localhost:3000/api/location';

  $.ajax({
    url: my_url,
    type: 'GET',
    data: {
      near: location
    },
    success: function(response) {
      localStorage.setItem('venue_data', JSON.stringify(response));
      localStorage.setItem('location', location);
      window.location.href = '/itinerary.html';
    },
    error: function(error) {
      console.log('Error: ' + error);
    }
  });
}
Using my localhost server (for now), I send the user-inputted location and get back a list of venues and some basic information for each of them. I store this response in localstorage, one of the super useful features of HTML5, along with the submitted location and then I change the user's location to the itinerary page.
Itinerary page
The itinerary page loads up it's HTML which is pretty barebones and once the page has loaded it begins to fill in the page with information. When the DOM (Document Object Model) is loaded it will first of all set the name of the itinerary using
either the location, or the custom name you've already set for it.
While doing this it begins to process the server response, starting with whether or not the response is what we expect; an array of venue objects.
Depending on what we find in the response, the page will call a set of component building functions that will create HTML in real-time and add it to the page. Here is an example:
function build_itinerary() {
  if (venues.statusCode !== undefined || venues.venues.length === 0) {
    let new_element = build_no_results();
    itinerary_container.appendChild(new_element);
    return;
  } else {
    let itinerary_items = venues.venues.slice(0, 5);
    itinerary_items.forEach(function(element, index) {
      //start component builder
      build_item_pill(index);
      //add each venue index to the list
      used_venues.push(index);
    });

    //contains all event listeners for item pills
    add_event_listeners();
  }
}
this build_itinerary function sets off a chain of component building functions to inject the HTML and the venue information into the page, an example of one of these functions would be:
function build_item_pill(venue_index) {
  let new_item = document.createElement('div');
  {
    new_item.className = 'slot_box';
    new_item.dataset.travel = 'false';
    new_item.dataset.venueid = venues.venues[venue_index].id;
    new_item.dataset.index = venue_index;

    //set travel coords for later use
    let location = venues.venues[venue_index].location;
    let latlong = location.lat + ',' + location.lng;
    new_item.dataset.coords = latlong;

    {
      let article = build_article(venue_index);
      new_item.appendChild(article);

      //if this isn't the last item, build travel
      if (venue_index !== 4) {
        let travel = build_travel();
        new_item.appendChild(travel);

        let travel_instructions = build_travel_instructions();
        new_item.appendChild(travel_instructions);
      }
    }
  }
  itinerary_container.appendChild(new_item);
}
Creating the item_pill uses a combination of vanilla JavaScript and jQuery functions to create new elements and then apply classes and the like to them, we also see that some of the information I add to these elements are more functions, this is to keep the code maintainable and easy to manage. By having relatively small and reusable component building functions.
Dynamically showing and hiding travel instructions is something that took a bit of time to get working properly for the Itinerary page. I ended up adding a class to each individual instruction to denote which mode of transport the instruction belongs to, then when the select element is changed there's an event listener to catch the new value. Then a function is called to iterate through all the travel instructions and hide all elements that are not a part of the new transport mode.
An issue I had with the travel HTML is that it's very difficult to programmatically inject a raw SVG into the DOM due to the fact it uses the SVG namespace, because of this I had to inject the SVG as an image and that ruined some of the aesthetic for the 'button' because I had been applying classes to the strokes in the SVG.
Venue information
I decided that the best way to display venue information was in a modal dialog (pop-up) rather than another page, this is because you can access multiple venues from the itinerary page and it should be easily accessible and traversable. This means that returning to the itinerary page should be easy. Coupling this idea of traversability and our typical use-case, not having to load another page with each venue seems to be the best choice.
To do this I capture some data stored in data-roles in the item container and use this to send a request to my server, the response of which is used to build venue information dialog.
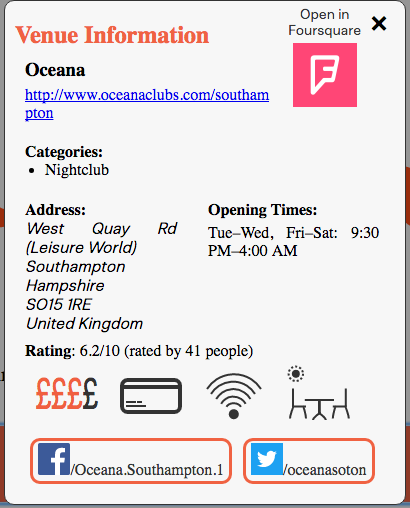
To combat the fact that the server response could take a second or so, I also added a fade-in animation for the modal over 2 seconds.
Throughout both the itinerary and venue information pages I have made use of data-roles which are a fantastic addition to HTML5 which allow developers to embed attributes in the HTML of elements for your scripts to use. I use them to store various information such as if an item is pinned, venue IDs (which are then used in the request to the server for more information) etc.
Remaining development work
The remaining tasks left to complete before hand-in are:
- Genre filtering (and creation of accompanying assets)
- Option to download/print your itinerary
- Reorganise itinerary items into a logical route
- Stretch-goal: Shareable itinerary links
Genre filtering
I've talked about this particular feature in previous blog posts. It is the idea that you should be able to assign a genre to an itinerary slot and only get things to do of a certain genre in that slot, for instance getting only food places in one slot.
Looking at how much time I realistically have left for development, I imagine this is going to be a stripped back implementation where I will only really be able to allow users to specify top-level genres such as restaurants, landmarks and cafés rather than allowing more specific structuring. I'm not too upset about this though because after reviewing a variety of random venue data from across the UK I've realised that the data supplied by FourSquare is actually pretty non-uniform. I think that this is because the majority of FourSquare's users are US-based and without a local user base to crowd-source information from it is difficult to build a complete dataset for venues.
Option to download/print itinerary
The idea behind downloading an itinerary to take with you is still just to download the webpage with all of the itinerary information visible.
I am thinking that it may be worth injecting JSON and some accompanying JavaScript to allow users to view venue information on downloaded itineraries too, but I'm not sure if it's actually needed or will be seen as helpful as it will bloat the download.
Reorganise itinerary items into a logical route
Route plotting was one of the pillars of Wandr at the beginning of the project but it's faded into the background over time as it became more apparent just how difficult it would be to create a proper pathfinding algorithm and not just brute-force a shortest-path for the given itinerary.
At this point I'm not even sure if it's worth including anymore when I could just allow users to drag and drop itinerary items to change their order. I think that dragging and dropping would allow another level of customisation to the user and would give a nicer experience than having the application reorder all your items for you, especially when you could end up with all your food items one after the other due to the pathfinding algorithm.
Shareable itineraries
An idea I had while talking to a friend was to have another webpage in my application that dealt specifically with recreating an itinerary. I could create another route on my server that's only purpose was to return all the data needed for my front-end to rebuild an itinerary using only an ordered array of venue IDs.
I think that it would be a really helpful addition to the application because then users could share their itineraries with people, although they wouldn't be editable that could be changed at a later point.
I'll be back in a week with my final iteration review and maybe some words about how the report is going.